

So you’ve decided to give Nozbe a try. You’ve registered and downloaded the app to your computer or smartphone… We are thrilled! And you will be, too! Read on, follow the tips and take your productivity to a whole new level. Let’s get started!
Day 1: Clear your mind
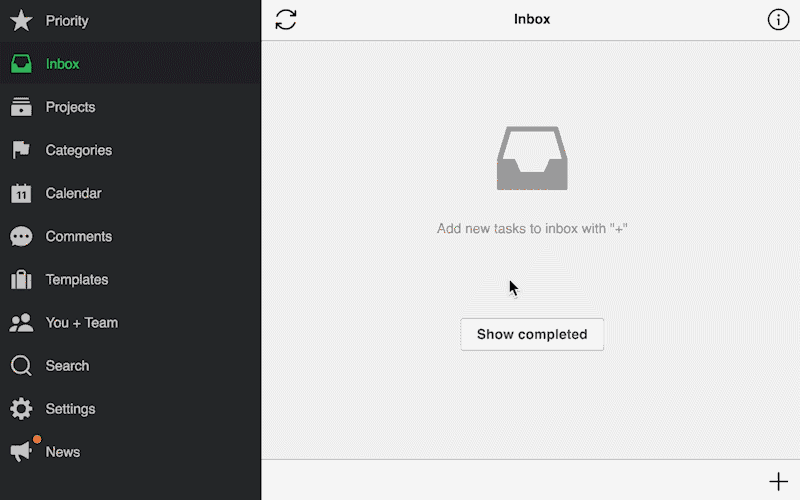
You think about and try to remember too many different things at once—and it’s no good. It’s exasperating and causes anxiety. It can help to clear the mind and get all those overbearing details into your own productivity system—and that’s when Nozbe comes in. You will now add your first items to your Inbox (the second tab on the menu on the left).
✅ Action: By using a “+” button in your Inbox view, add everything that’s currently on your mind in whatever order it comes. Write whatever you’re thinking about—it doesn’t matter whether these are trivial concerns or grand strategic goals. Write out everything, one after another, line after line. Give yourself about 15 to 30 minutes.
One of the biggest advantages of Nozbe’s Inbox is that you always have it with you. You can add tasks to it using any of your devices—whether it’s a smartphone, a tablet or a computer. You can add tasks with a quick keyboard shortcut or a couple of simple clicks, using voice commands, etc. (read more about it here).
Day 2: Arranging and weighing tasks
After you’ve cleared your mind and put everything in your Inbox you’ll, have a very long list of random tasks. Now, clear your Inbox. Go through this list and see whether:
- some of them can be deleted (because once written down, they don’t seem so important),
- some of them are related (e.g., they are steps to accomplish the same goal),
- some of them are very important and need to get done ASAP (they will become your priorities),
- some of them could or should be done by someone else (you will later delegate them to your teammates, friends or family members), or
- some of them are very complex (they will become your projects).
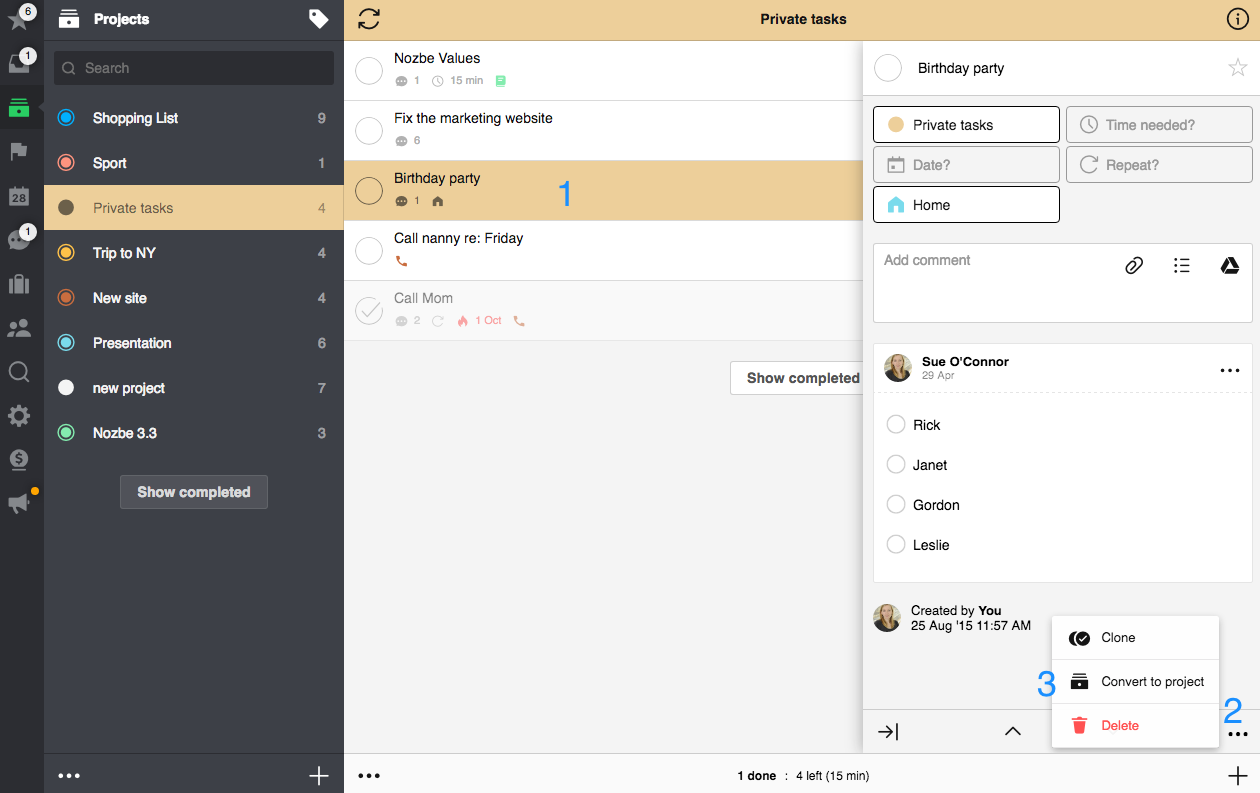
✅ Action: Delete the tasks that you don’t want to spend time on after all. To do that, enter the tasks details and use the “…” icon in the bottom-right corner. You will find the “Delete” option there.
✅ Now, look at the tasks related to the same goal/topic and the ones that seem complex—you will need to create projects for these items.
✅ One way of creating a project in Nozbe is to choose Projects in the left hand side menu. Once there, use the “+” button to start a new project, type the project’s name and hit “Create” (leave out all the options that appear in the pop-up window for now).
The name of a project should reflect its goal. You can stick to using nouns and short descriptions of what the project’s goal is, e.g., Sister’s birthday, Holiday in France, etc.
✅ To complete your “Nozbe mission” today, create several projects representing your main professional and personal goals and move the tasks from your Inbox there. To move a task from your Inbox to a certain project, click the Inbox button in the task’s details to open the project chooser. Then, select your project of choice to move the task there.
Day 3: Planning out your projects
You have an empty Inbox (as you deleted or moved all the tasks to appropriate projects), a list of projects representing your goals and a couple of tasks in some of them. Just to be precise: a project is anything that requires more than one step to complete. Therefore, every complex action is a project—your goals become projects.
✅ Having said that, let’s convert the tasks that you added to your Inbox and that are too complicated to be just tasks into projects. This is very simple. Just open the task and then open its details, using the “…” button. Now, select the “Convert to project” option from the dropdown list. That’s it!
There is a chance that the tasks you wrote down during the “Clear your mind” exercise don’t make your projects complete and ready to work on. I suggest that today you focus on planning out your projects by adding more specific tasks to them.
✅ Action: Go to your list of projects by choosing “Projects” from the left-hand side bar. Choose a project you want to start with and add more steps required to complete it. To add a task to your project use the “+” button in the bottom-right corner of the Project view.
Note: There are two types of projects: (1) goal-oriented projects, which have a concrete goal and can be completely finished, e.g., “Buying a fridge," and (2) ongoing projects, which are never finished because they are an assortment of tasks or activities concerning a specific aspect, e.g., “Blog post ideas."
Look at these project templates to get inspired about what goal-oriented projects you might want to start:
- Recording a podcast
- A code review - programming
- A business trip checklist
- Holiday in Morocco
- Training plan for 10 km
Here are some ideas of what ongoing projects you may need:
- Marketing
- Family budget
- Blog post ideas
- Finance
If you are a lawyer, insurance agent, doctor or personal trainer, you might consider creating a separate project for each of your clients/patients and keeping all the information, progress notes, meetings and documents related to them in one place.
Day 4: Task parameters
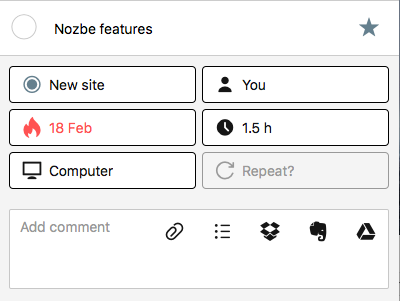
As you have probably noticed, a task is not just a line with a name. Each task can have a:
- date - meaning a deadline - for scheduling the completion date and time,
- time needed - for including the amount of work expected for a specific task in your daily agenda,
- responsibility - to let you have your friends or teammates help you out,
- project - to assign a task to a project,
- category - to group certain tasks together in order to get them done faster, and
- comment - to be able to keep track of the task’s details, keep a record of progress and communicate with other people working on it.
✅ Action: Go through all the tasks you have and see if you want to set a date or time needed parameter for any of your tasks. Add dates to the time-sensitive tasks; set the time needed if you want to plan your day well and see how much time each task will take you. If you decide to move the task from one project to another, use the “Project” parameter button.
You will focus on the other parameters tomorrow and on. Remember, you can still add tasks to your projects and note your ideas and thoughts in the Nozbe Inbox.
Remember, however, that your Inbox is not a place to store your tasks. We recommend zeroing your Inbox every day by arranging the tasks in appropriate projects or deleting the ones you won’t take care of.
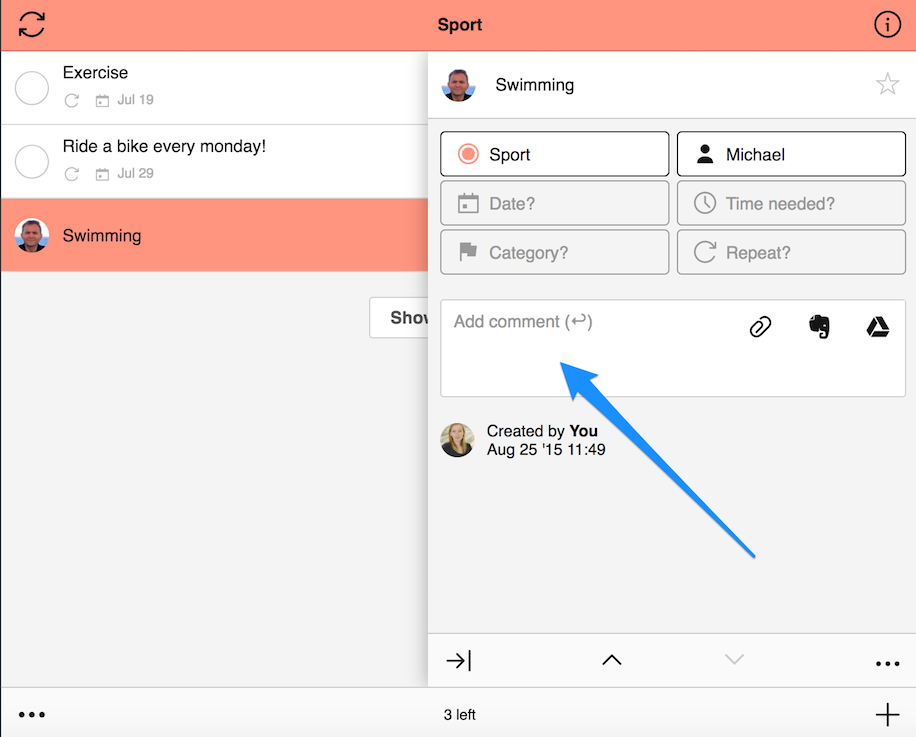
Day 5: Task comments and attachments
As we learned yesterday, each task has a comment field. This is a place where a discussion with your teammates can take place. If you are using Nozbe alone for now, this is a perfect place for adding task details and progress records.
✅ Action: Add comments to your tasks, one by one. This way, when you get back to it at any time later, you’ll have all the information needed to get it done. To add a text comment, just click/tap on the comment field and start typing.
Sometimes, in order to optimally list activities, you’ll need something between a project and a task — a task with a list of small steps. In Nozbe, all you need to do is add a comment in the form of a checklist. This is especially useful when:
- a task requires a bit of time but not more than a few hours,
- you know that you could finish the task in a day or in one sitting, or
- a task is made up of a few steps that you simply don’t want to forget.
✅ Action: Add some checklist comments to your tasks. To do so, choose a “Checklist” option in the comment field:
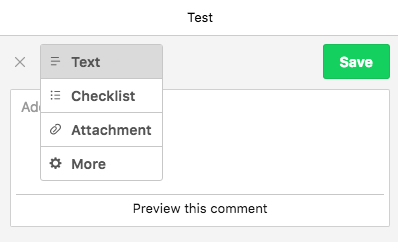
Then add the following steps by typing them in and hitting the “Enter” or “Return” key.

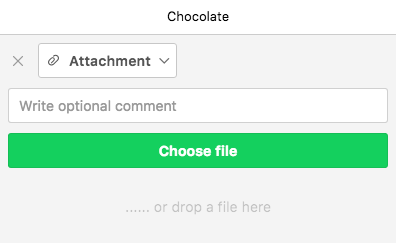
Of course, you can also add attachments to your tasks.
✅ Action: Where needed, add a comment in the form of a file or a picture—just choose the “Attachment” option. Click on the “Choose file” button to browse for a file or drag and then drop it here.
These are basic comments that should be enough for the beginner :) If you want to proceed and attach third-party files, check out our help page.
Day 6: Priorities—what should get done in the first place
Once you’ve sorted your ideas, plans and commitments into tasks with projects and parameters set, it’s time to get some of them accomplished, right? :)
✅ Action: Go to one of your projects, take a look at its list of tasks and consider which could be the next action, meaning: which of these tasks will get you moving as quickly as possible towards your goal at this moment? The task you choose will be your priority. Click on the star next to it to have it visible not only in this project but also on your Priority list, which is your Nozbe command center. Repeat this procedure for any other projects you want to work on this week.
Remember not to mark all tasks as priorities. This would only undermine the purpose. You can have entire projects without any pressing next action. It all depends on how you’d like to set it up.
✅ Action: Mark the tasks you’ve completed as done with a ✓ in the circle placed just on the left from the task’s name in the Tasks list in order to archive them and feel the satisfaction of getting things done! :)
See which tasks will automatically appear on your Priority list.
Day 7: Categories—to group similar tasks
At this point, you’ve already mastered the art of adding tasks (with comments, attachments and priority value) and putting them in projects. We haven’t discussed one of task parameters though—categories.
Although you’re working on tasks from different projects, you often do them using similar tools or working in comparable conditions. This is where categories come into play. Here are a few examples:
Tools
- “Smartphone” (you use your phone to take care of a few unrelated matters from different projects)
- “Computer” (it’s sometimes easier to do certain things on computers than on mobile devices)
- “Printer” (certain documents from multiple projects require printing)
Places
- “At the office” (things that need to be done when at work)
- “Away from home” or “Errands” (in order to not forget to go to the post office, do the shopping, buy flowers, etc.)
Ways of handling tasks, time and other variables:
- “Whenever” (for tasks that aren’t among the most important, but it would be nice to take care of them whenever you find the time)
- “Urgent” (for tasks that require immediate action)
- “Client’s name” (for tasks related to a specific client if you don’t use a specific project for each of your customers)
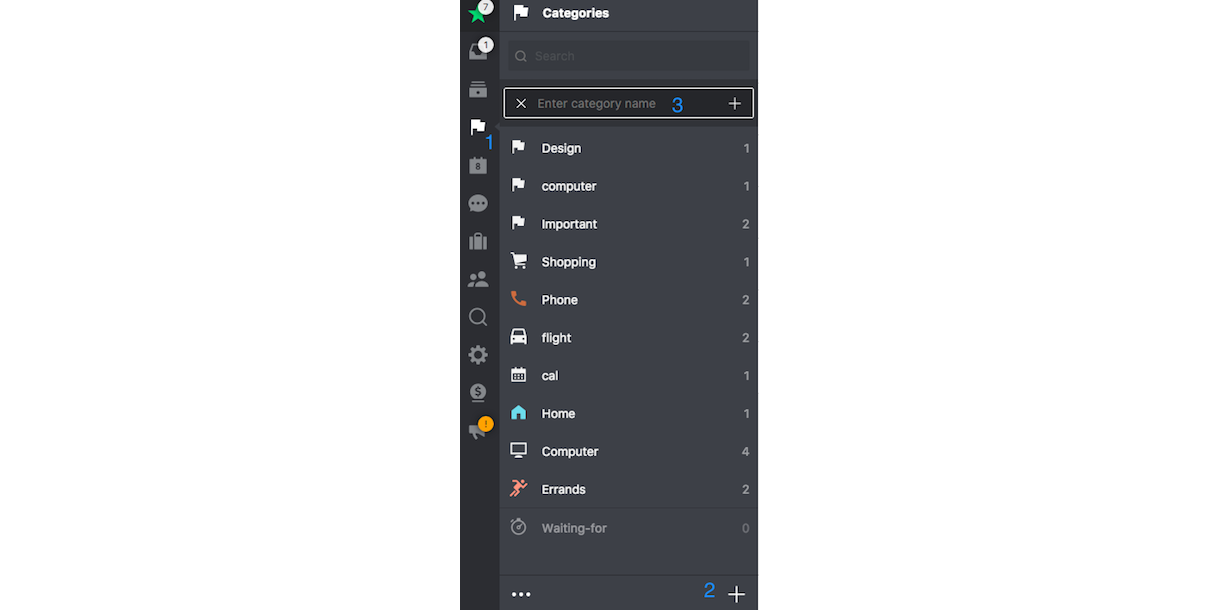
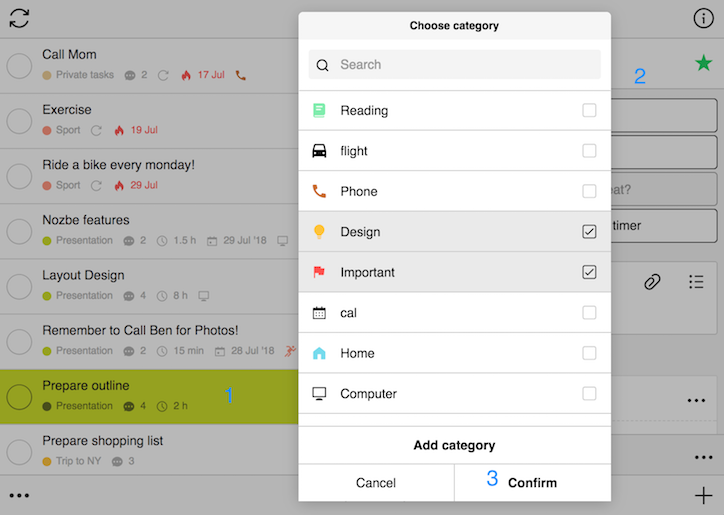
✅ Action: Create a couple of categories that will match your workflow. Go to the “Categories” view (1) and use the “+” icon (2). A text input window will appear at the top of the list (3)—type the name of your category and save it.
Please note that there is another way of adding categories—you can learn it from our help page.
Now you have a couple of categories to help you save time so that you aren’t changing the context or the process of your work too often. Let’s assign the categories to some of your tasks.
✅ Action: Go to your task and choose the Category button from among its parameters. Tap on the “Category” and pick one or more from the drop down list. Don’t forget to confirm your choice!
Now, if you want to take care of the tasks related to client X, go to the category list and pick the “Client X” category. You’ll see the list of tasks that have this category assigned.
Day 8: Labels—to help you organize your projects
Having a flat list of projects in Nozbe is easy to master, but the more obligations pile up, the harder it is to find specific projects and group similar ones that you want to work on right now. This is when labels, which are intended to group similar projects, come in handy.
Labels examples:
- “Blog” label for all projects related to running your blog (posts, ideas, social media, etc.).
- “Private” label to mark all the personal projects you want to see when away from work.
- “Inactive” label where you put projects that have started but are on hold for an unspecified time, e.g., the client is not yet sure as to whether to move forward, but you already have some useful information for the project.
✅ Action: Create a “Personal” label and mark all your private projects with it. First, go to one of your personal projects. Enter its details by using the “i” icon in the upper-right corner. There, you will see the “Change labels” button.
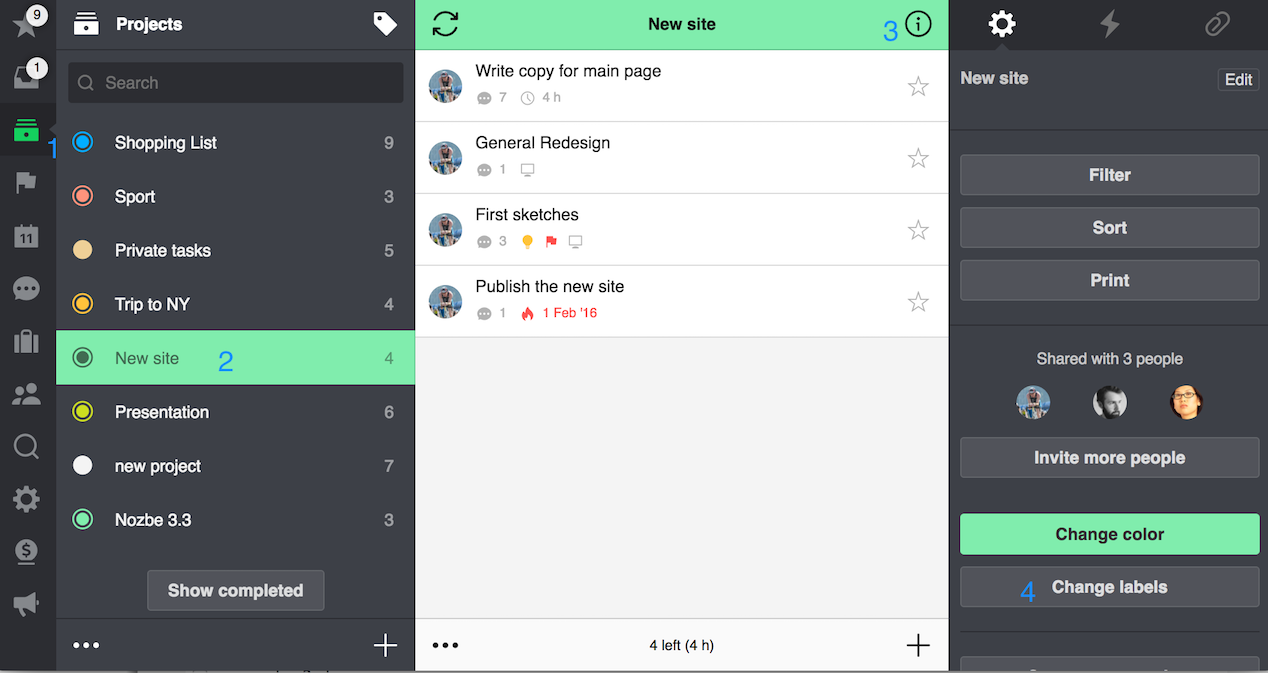
✅ Click on it and then choose the “New” button. Type “Personal,” save it with the Enter/Return key, select it on the list and use the “Confirm” button to add it to the project. Go to other private projects and assign this label in the same way to them.
Now, when you want to focus only on your personal stuff or while on vacation, go to your Project list, choose a “label” icon on the top and filter your list of projects with the “Personal” label. This way your work-related commitments won’t stress you out during your free time.
You can read more about labels on our help page.
Day 9: Cooperate in Nozbe to get more done
Since its creation, Nozbe evolved from a personal task manager to a powerful team collaboration platform. Communication and project management becomes much more efficient with our app. As a beginner, you might want to first invite just one or two people to work with.
✅ Action: Invite someone to your team.
1. Go to the “Team + You” section in the icon bar on the left. 2. Click the “+” sign at the bottom of the team view. 3. Type the email address of the person you wish to invite and “Confirm."
After you’ve accepted a confirmation screen, this person will receive an invite to create a Nozbe account within your team.
Note: During your 30 day free trial, you can invite as many people to your team as you’d like. Once your trial is over, you can choose one of our plans.
From now on, whenever you want to work with your partner, you will be able to easily invite them to one of your projects and delegate them tasks or have them add some tasks for you.
✅ Action: Invite someone to share a project with you. Go to your project, use the “i” icon in the upper-right corner to open the infobar. Now:
- Choose the “Invite people” button.
- If the person is already on your team, choose him or her from the list and confirm.
- If you want to invite a new person only to share this specific project with you, click “Add person."
- Type their email address and hit the Enter/Return key.
- Confirm your decision.
Once you confirm, they will get an email invitation to your project and, if they already have a Nozbe account, they will see an envelope ✉️ icon located at the top of the icon bar, just above the Priority list.
Learn more about project sharing here.
Day 10: Reviewing
You’ve been using Nozbe for 10 days. You know how to add tasks, organize them in projects and with the use of categories. You know how to invite people to your projects to get even more done. Your real productivity system is ready and hopefully working well. Continue this way and complete your projects better and faster.
✅ Action: To make sure nothing goes wrong, you need to review your system regularly. This is called a weekly review and you need to perform it consistently.
To learn how to run a review correctly and effectively, you might want to use this practical, step-by-step template.
You can use this template in the web browser or add it to your Nozbe account and have it saved as your own project.
You’ve learned a lot, but there are still some hacks to check out
We have plenty of resources for you to learn and to use in Nozbe.
✅ First, click here to open a project template with basic exercises and actions you need to know to employ our app.
✅ Then, use this template to move forward and get to know more options in practice.
✅ Please, use Nozbe and whenever you feel “blocked,” go to our Help Page and use the search window to find the information that will help you get going.
✅ We also encourage you to watch the full video tutorial and follow the “10 Steps to Ultimate Productivity” course.
✅ Should you need any help, don’t hesitate to contact our friendly customer support team at questions@nozbe.com or via the contact form within the app.
Thank you and good luck! :)


