

When using Nozbe with other people, in a “team” environment, we can divide Nozbe users into 2 groups that we can conventionally name: “owners” and “cooperators”. The “owners” are those who own the multi-user account in Nozbe and can add people to their own team. The number of team members depends on the plan the “owner” decided to pay for. The “cooperators” are people who have been invited to the team by an “owner” - they can have their own projects but have fewer prerogatives than “owners” when it comes to team management.
Now, imagine Edward who is a manager in a big company. He has decided to use Nozbe to work more efficiently with his team. He bought Nozbe PRO plan (he became an “owner” :)). He also ordered 14 additional accounts for his subordinates and invited them to his team in Nozbe.
What Edward did in order to create his team in Nozbe
- First he entered the “Team” section in Nozbe
- There, he chose a green silhouette icon to add a new team member
- He entered his subordinates' e-mail addresses to send them Nozbe invitations
- He clicked ADD button
And so, Edward as well as his teammates (who obviously accepted the invitations :)) can now create projects and share them with each other, their clients and friends.
New employee on-board
Edward’s company has just hired a new marketing specialist, Rob. He will have to cooperate with many people to do his job well. His duties will involve communicating with the IT, finance and product guys as well as Edward and his assistant of course. Thus, Edward needs to add Rob to their team in Nozbe. As this is neither the first nor the last person to join his team, Ed has created a project template some time ago. That was a smart move - all he has to do now is make a project out of the existing template. There, he has some simple tasks that will help him introduce Rob to the team and provide the new employee with materials and information he might need to get started.
This is Edward’s project:
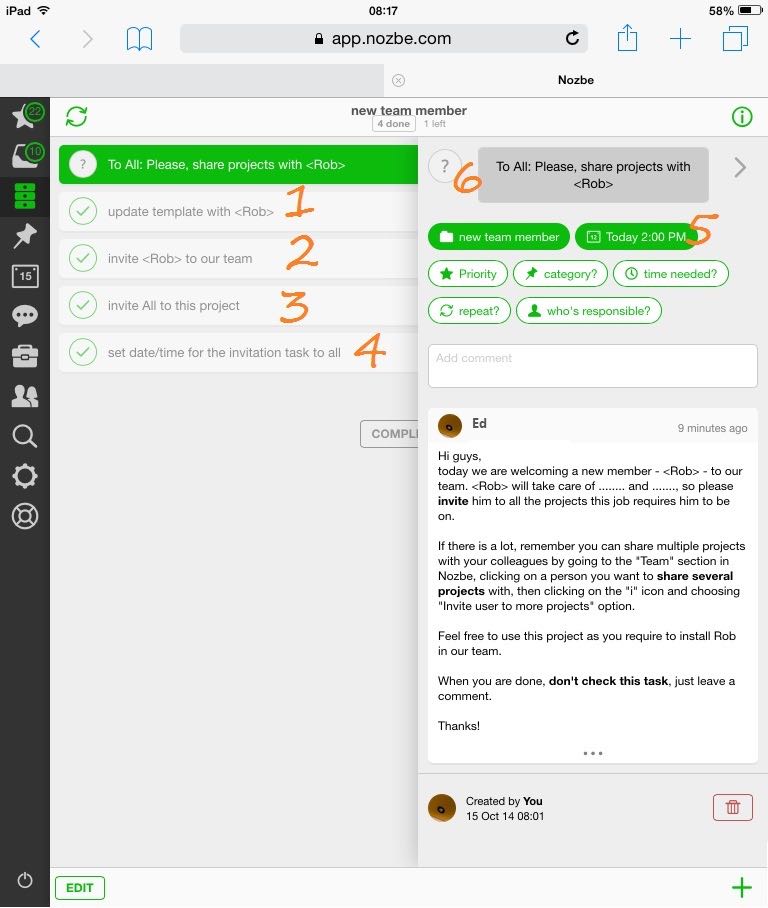
Edward needs to:
- Update template with
- Invite
to the team (he does the exactly same thing he did when adding his 14 subordinates before) - Invite all the subordinates to this project
- Set a date/time for the invitation task “To All” (5.)
What did Edward ask his teammates for?
One of the tasks Edward had in his template-project wasn’t delegated to him or to anyone else (there was a question mark not a photo/avatar next to it <6.>). He set a due date for today and so the task jumped to the Priority list of everyone in the project - this way everyone in Ed’s team could see it. This is what Edward wrote in a comment to this task:
Hi guys,
today we are welcoming a new member -
If there is a lot, remember you can share multiple projects with your colleagues by going to the “Team” section in Nozbe, clicking on a person you want to share several projects with, then clicking on the “i” icon and choosing “Invite user to more projects” option.
Feel free to use this project as you require to install Rob in our team.
When you are done, don’t check this task, just leave a comment.
Thanks!
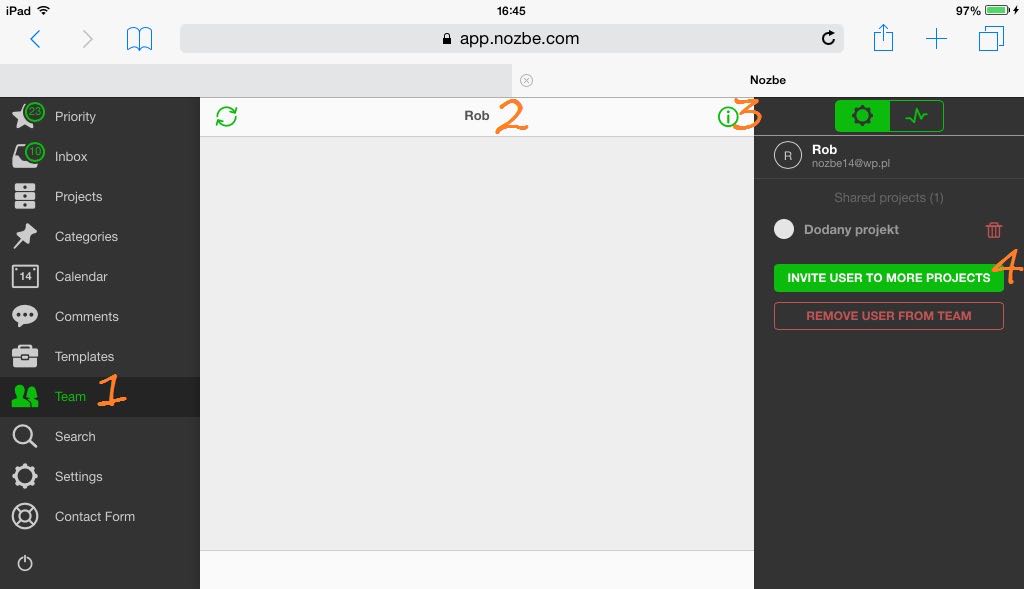
What exactly Edward’s teammates need to do now?
To add Rob to several projects at a time Ed’s colleagues need to enter the Team section in Nozbe (1.). There, they need to choose a person they want to share their projects with (e.g. Rob)(2.) and click the “i” icon at the top-right corner (3.) to open the infobar with details of the user. In the infobar, they will need to find an “Invite user to more projects” button (4.), click on it and choose the projects they wish from the dropdown list that shows up. Then, a quick confirmation and Rob has access to the certain projects and all the materials and attachments related to them.
What if someone leaves the team?
It turns out that Rob joined Edward’s team because Carl is leaving it - he is retiring. In situations like this, it is recommended to remove a person who will no longer work for the company - mostly for the data-security reasons. What Edward is going to do is ask his team members to remove Carl from all work-related projects they created and shared with the retiring colleague. This time, Edward will simply add a task with no responsibility assigned (question mark instead of the avatar again)(1.) to a common project they all share in Nozbe (2.). He will set a date and time so that the task will show up in the Priority list of all his subordinates.
This is a comment that Edward should write (3.):
Dear All, as of today Carl is no longer on this team so please remove him from all work-related projects that you have created.
In order to remove someone from your project, enter this project, click on the “i” icon to open the infobar, then go to “People in project” section and click. A list of people will appear. Choose the person you wish to remove, click on “…” icon and the click on “remove from the project” button.
When you are done, don’t check this task, just leave a comment.
Thanks!
To make sure everyone removes Carl from their projects he places a checklist (4.) with the names of all the people from his team and asks them to tick once their are done. Good idea - nice use of a checklist option :)
A quick guide to removing people from your projects
- Go to a project you’ve created and which you share with a person you wish to remove
- Click on the “i” icon to open the infobar
- Go to “People in project section and click on one of the avatars
- Find the person you want to remove in the dropdown menu
- Click on the “…” icon
- Click on “Remove from project” button
Final goodbye to Carl
Once Carl leaves the company, Edward should remove him from the team and from the projects he shared with him. Nozbe makes it easy - whenever the “owner” removes someone from the team, our app asks whether to remove him from the shared project too.
If you are an “owner”, please take a look how to remove someone (eg. Carl) from your account.
Go to “Team” section and choose your “Carl” :) Then, click “i” at the top-right corner (1.) to see that user’s details. Click the “Remove from team” button (2.). If you wish, tick the box (3.) to confirm removing Carl from all the projects you created and shared with your colleague. A final “Confirm” (4.) and you are done.
- post written by Magda, Nozbe’s COO

