
Email is (unfortunately) an integral part of our lives. Although made for correspondence, it soon became a task and project management system for many local business and huge corporations. See how to bring order to your emails and make them actionable.
- How to handle too many emails with Nozbe
- How to start emailing tasks to Nozbe
- How to email a task to a specific Project
- How to email your task to a specific Project Section
- Try using hashtags to set parameters
- Trick: How to email your task to the very bottom of the list?
How to Handle Too Many Emails With Nozbe?
Email is the most popular tool. Although designed for correspondence, it is used for communication and team collaboration which often results in chaos, slower project management and imperfect information flow.
- Too much of CC’ing and BCC’ing - just in case
- Including several issues in one thread
- Forgetting to attach files
- Not knowing which document version is the latest one
…are just a few problems that come along with using emails for projects management.
But everyone keeps using it, and many of us still try to treat emails as tasks. We add folders and colors in our inboxes, we leave emails “unread” in the inbox to remind us we should do something with them. However, it’s important to decide which emails are truly actionable and which are not!
To make sure we make this distinction we encourage you to send emails to Nozbe to convert them to tasks right away!
How to start emailing tasks to Nozbe?
To forward your emails to Nozbe and make them part of your productivity system, you need a unique email address. Let’s say, it’s a general email address to your Nozbe account. You can add it to your contact list in your email client (you can call it “Nozbe” or “Sir Anthony Hopkins” or whatever you wish.) When you forward an email to this contact, the task will appear in your Single tasks view and in the Incoming.
To get this general email address, go to ⚙️Settings > Add tasks via email. You can copy the address to clipboard and add it to your email contacts.
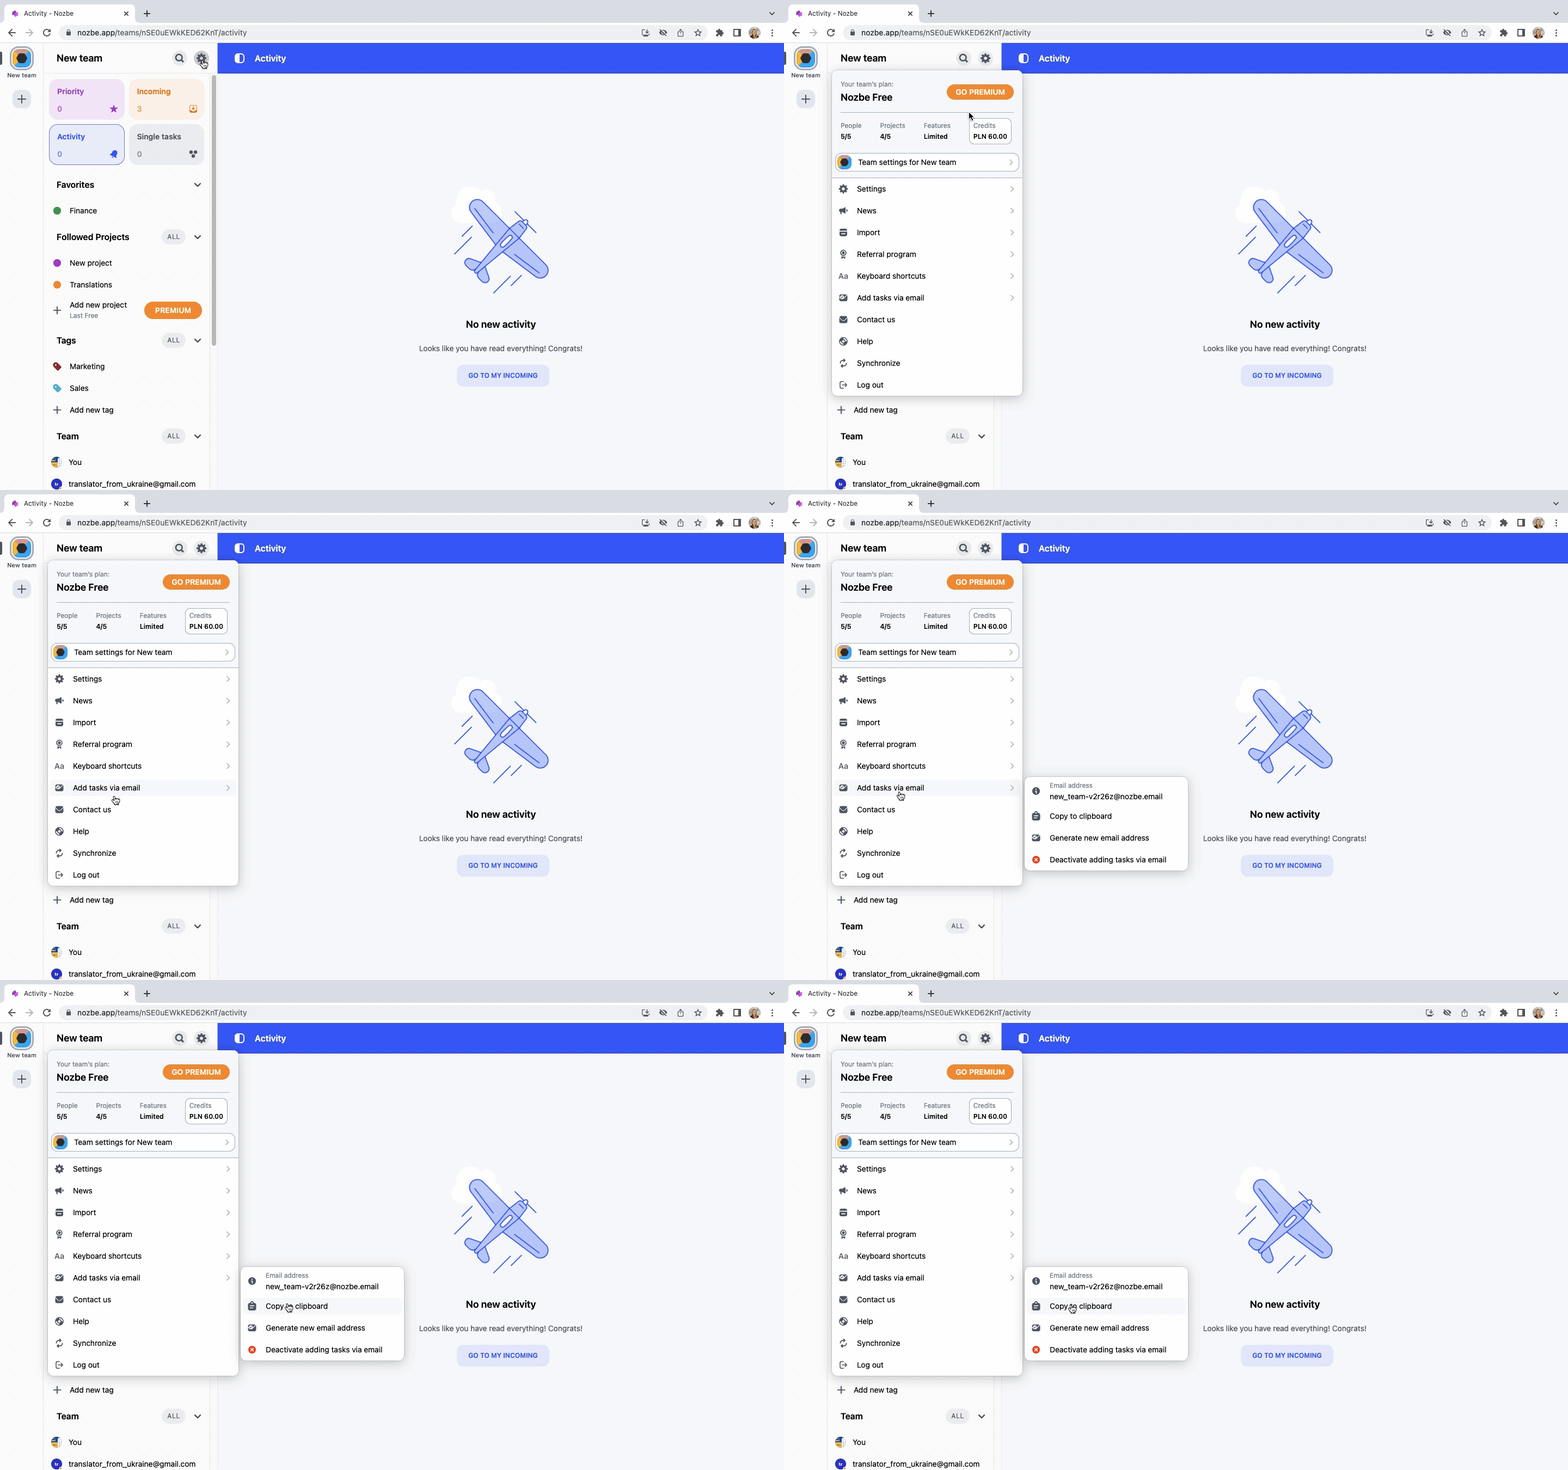
To send the first task, you need to go to your email client, open a new message, and paste the copied address or choose it from your address book.
👉 The email’s subject line will be your task name.
👉 The email body will become your task’s comment.
👉 All the attachments will also be added as comments in your newly created task.
How to email a task to a specific Project
If you don’t add any specific destination, your email will appear - as we already said - in your Single Tasks and Incoming views.
But here is a great news! You can easily specify a project to which you want your task to be emailed.
1️⃣ One way is to use hashtags, and you will read about it further in the article.
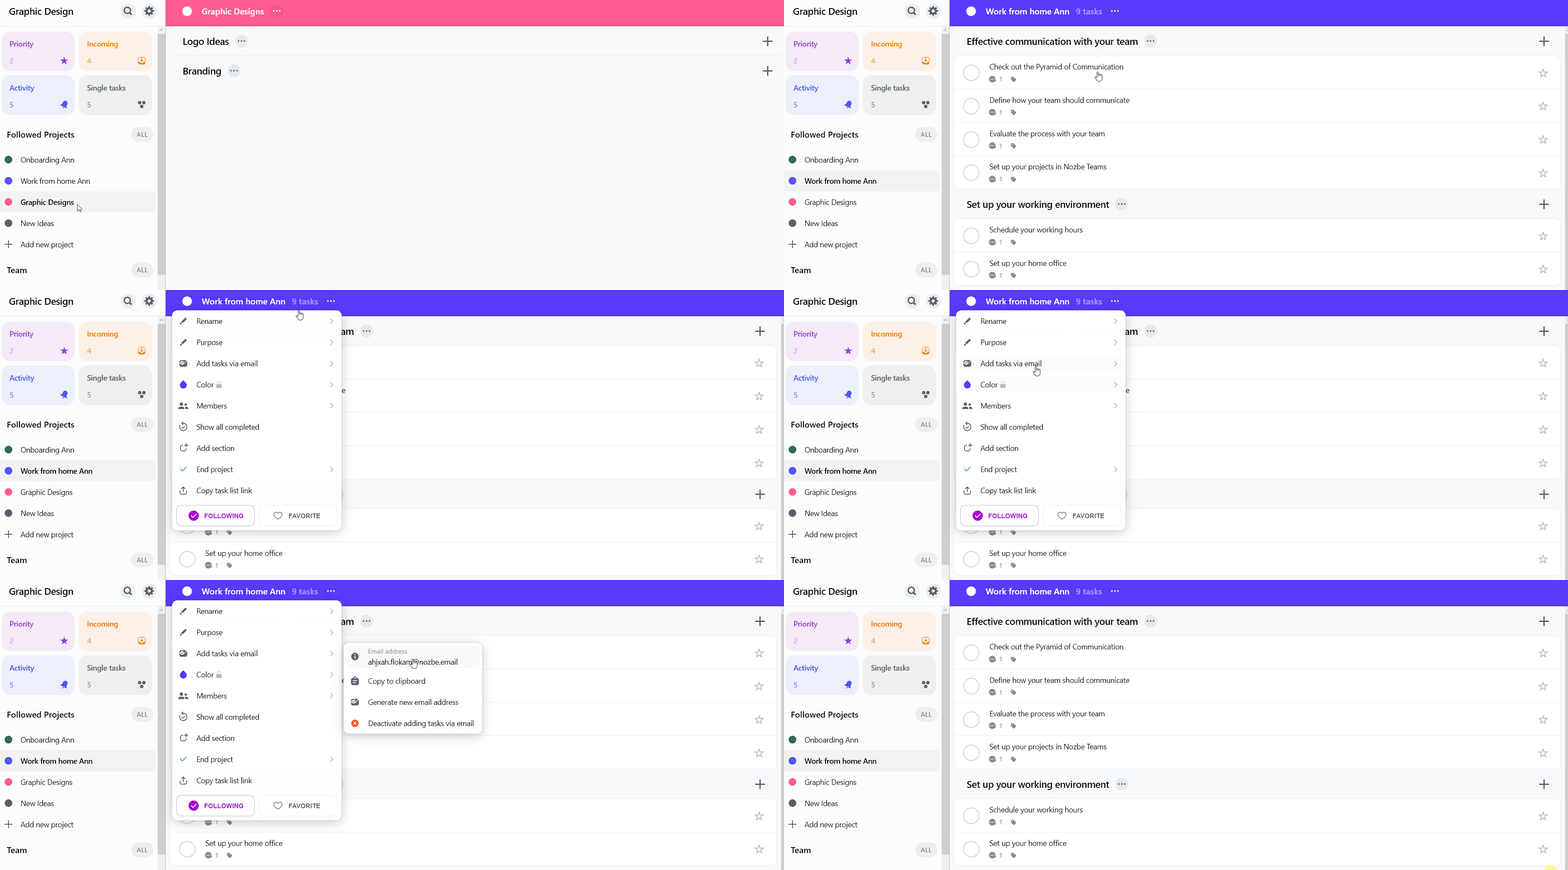
2️⃣ Another option is getting your project’s unique email address. To do so, you need to go to that project, open its menu (...) > Add task via email.
That’s it! This way you get the email address you have to use to send your tasks to that project. Again - if it is a one time action - you just copy and paste the address to your new email. If you send tasks to this project frequently, you can add this email address to your email contacts.
How to email your task to a specific Project Section
If you like to have your tasks neatly arranged, you might also forward your emails to add them as new tasks in a specific Section in one of your Projects.
It’s very easy actually and it works exactly the same way as sending tasks to a specific project.
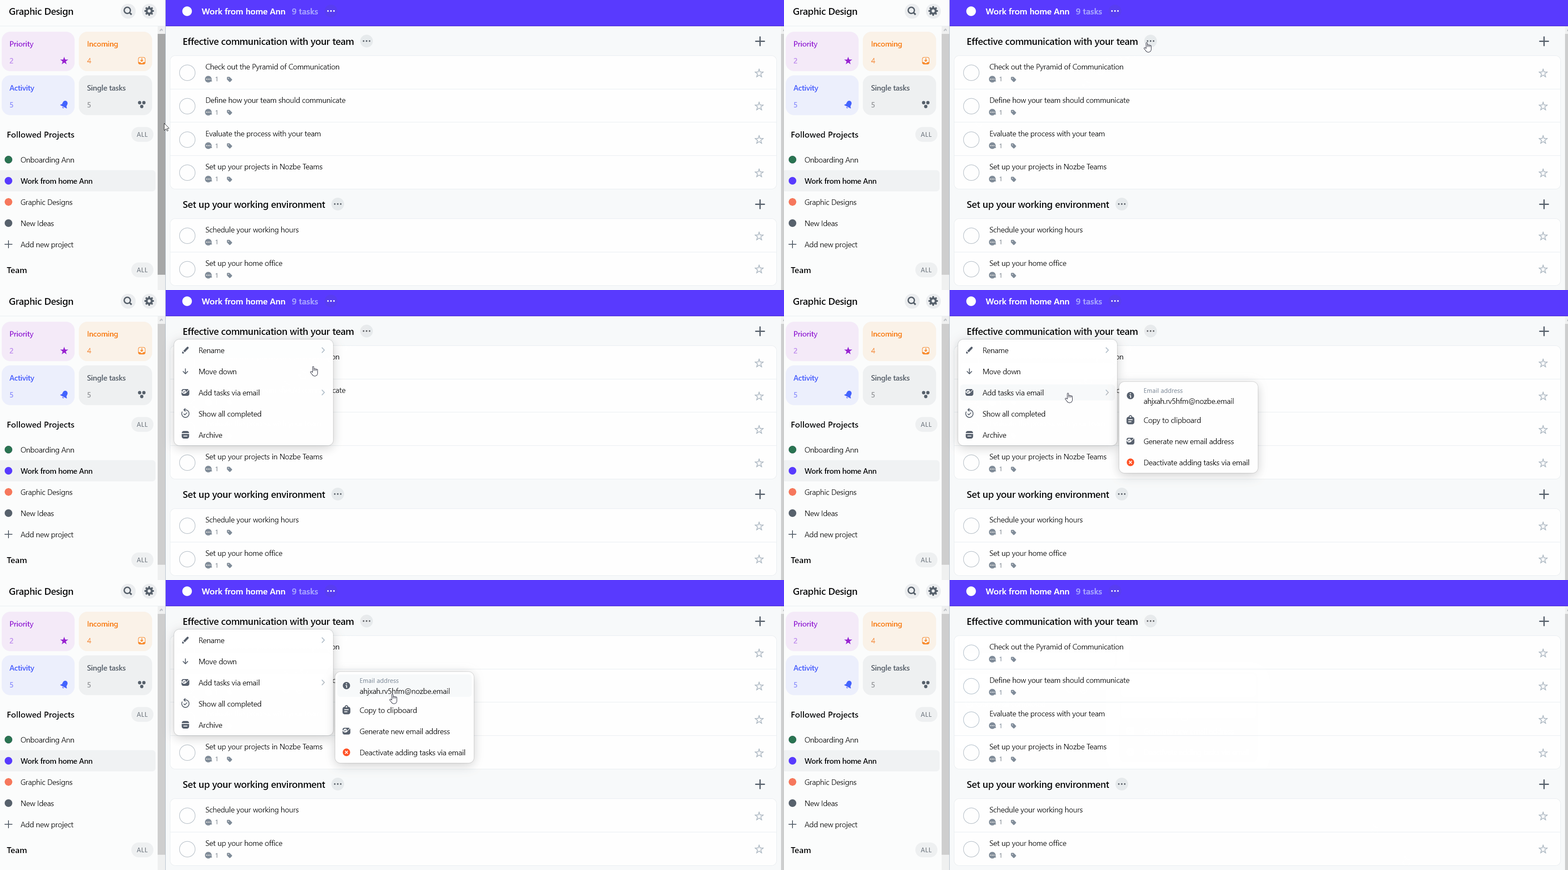
Just enter the section menu (...) > Add tasks via email to get a unique email address for this section.
How to delegate emailed task to a specific person
One of our users asked:
The answer is:
Yes, there is! You can delegate a task to a specific team member while sending it via email. In order to do that, in the email subject type #user_name e.g. #Robert or #Barbara Miller.
How to use hashtags to set other task parameters
You can use hashtags to define the parameters of a task you’re emailing to your Nozbe account.
👉 Type # and a parameter right after it in the email subject line (with no space after #).
Of course you should leave the email subject (as it will be your task’s name) and type hashtags right after it 😅
Here are hashtags you can use:
- #project name
- #project section name
- #tag_name
- #responsible person
- #every … (Tuesday, Saturday, etc.)
- #remind {day of a week, month}
- #{day of a week, month} [day of a month] [time]
- #! is to make your task a Priority and add it to your Priority view in Nozbe
Do you want to set up an exact date, e.g., a day or an hour? Here, you will find a few examples of how to do this:
- #friday -> upcoming Friday midnight
- #tomorrow -> tomorrow midnight
- #february -> task’s due date set to midnight 1st of Feb.
- #february 11 -> time date set to midnight February 11th.
- #february 11 11:11pm -> due date and time set to 23:11 on February 11th
- #february 11 11:11 -> the task’s due date and time set to 11:11am on February 11th
👉 The order of hashtags isn’t important - you can type them randomly
👉 What’s really helpful is that you don’t need to write the whole project/section/tag/user name! The system will recognize the correct parameter if you type just first 3 letters or more. Of course, the 3 first letters name has to be unique enough to enable the system to distinguish the project, person or other parameter.
👉 For the time being, hashtags are available only in English. You can’t set up parameters using any other language.
Trick: How to email your task to the very bottom of the list?
If you want to add your emailed task to the bottom of the list, you can easily do it.
Once you have your project’s or section’s unique email address, just add .down before the @.
For example, if your address is ahjxah.rv5hfm@nozbe.email, it will look like this:
ahjxah.rv5hfm.down@nozbe.email


